
Configuring localhost HTTPS for your Express Node.js Apps
Problem Statement
The Express web framework that comes out of the box with Node.js is one of the most widely utilized web frameworks on the planet. Expess really shines in its simplicity and ability to get your Api up and running in mere minutes. Given widespread adoption and knowledge of JavaScript, any developer looking to get into web development with Node.js should at a minimum take a brief look at the Express js web framework.
When starting a new Node.js Express project, Express defaults it’s web protocol to http. While this may be great for very basic web applications, nearly all Express apps will eventually require https to ensure secure and encrypted communication takes place for all web requests. In this post, using the wonderful express-generator, I will demonstrate how developers can configure their locally hosted Node.js Express application for development with https.
Basic Overview
I’m a big fan of automation and using out of the box tools, so for this tutorial, we will start with a basic express-generator app. After generating our express app, we will tell the Express framework to use a specific cert that we generated locally, and that cert will tell the browser to look to the local machine as the Certificate Authority for cert verification. As aways, you can find the code for this tutorial on my github at https://github.com/BrianMikinski/expressjsssl
A basic overview of what is required for Express of ssl is as follows
- A valid SSL certificate
- Installation of the valid SSL cert to a local Certificate Authority (CA), and…
- Proper configuration of Express to use our use our locally generated certificate.
The Real Plan
- Clone expressjsssl express js Starter Project from my GitHub or 1a) Start a new app from scratch
- Install Chocolatey
- Install OpenSSL
- OpenSSL Certificate Creation
- Certificate Installation
- Update npm run-script
Clone expressjsssl Starter Project from GitHub
If you’re not interested in totally starting from scratch, I have an express js repo configured for you to jump to the goods and get started. Clone this project from GitHub using the following git command if you would like to fast track your way through the post and just see the code run locally
1
git clone https://github.com/BrianMikinski/expressjsssl.git
If you’re here for the long haul, let’s get started building our cert and configuring our Express app!
Starting a new Express App from Scratch
For the sake of this local host SSL demo, if you are creating a new app from scratch, I would suggest creating the app without a front end web framework. Type this command into you favorite terminal to build your new Express app
1
npx express-generator --no-view
At the conclusion of the npx express-generator command running, you should have brand new Express web app that contains all the dependencies necessary to build a Node.js rest API as well as host web page in the classic index.html format. The index.html can be found in the public folder if you would like to give it a look.
After creating our new app we need to install all dependencies by running and npm install command using
1
npm i
At this point we’re ready to get started on creating a Certification for localhost. Let’s keep cooking!
Install Chocolatey and Starting to Work With SSL
Prior to creating an SSL cert to be installed in your local Certificate Authority, we need to first install OpenSSL.
When running on Windows, you can install OpenSSL using a fantastic package manager for Windows called Chocolatey. Go and grab the following PowerShell script that can be found at Installing Chocolatey and run them under an admin PowerShell window. After installing Chocolatey as a package manager, we’re now ready to install OpenSSL (Note: you definitely will need to close your PowerShell window and may even need to restart your computer after installing Chocolatey to get the $PATH environment variable to properly pick up)
1
Set-ExecutionPolicy Bypass -Scope Process -Force; [System.Net.ServicePointManager]::SecurityProtocol = [System.Net.ServicePointManager]::SecurityProtocol -bor 3072; iex ((New-Object System.Net.WebClient).DownloadString('https://community.chocolatey.org/install.ps1'))
Install OpenSSL
With Chocolatey installed, we’re ready to install OpenSSL (using Chocolatey) which will allow us to generate certificates and keys for the express js CLI to us.
1
choco install openssl
To test that open ssl was properly installed, run the following command
1
openssl version
If you recieved output stating the version of OpenSSL that you are running, you should be good to go.
OpenSSL Certificate Creation
With OpenSSL installed the next step is to build a certificate that we will ultimately instal locally to the correct certificate authority. To generate the local cert, navigate to the express jsssl repo folder that was cloned from github and run the generateSslCert.ps1 PowerShell script. This script will call OpenSSL passing in cert definition defined in ./ssl/certdef.cnf and place the certificate along with a key in the ./ssl folder of the nextjsssl starter project.
certdef.cnf
1
2
3
4
5
6
7
8
9
10
11
12
13
14
15
16
17
18
19
20
21
22
[req]
default_bits = 2048
prompt = no
default_md = sha256
x509_extensions = v3_req
distinguished_name = dn

[dn]
C = US
ST = TX
L = HTX
O = IT
OU = IT Department
emailAddress = webmaster@ustxhtx.com
CN = localhost

[v3_req]
subjectAltName = @alt_names

[alt_names]
DNS.1 = *.localhost
DNS.2 = localhost
Generate SSL Cert PowerShell Script
1
./generateSslCert.ps1
Note: If you haven’t yet downloaded the expressjsssl repo or simply do not wish to clone the repo, the openssl command to create your localhost cert can be found below…
generateSslCert.ps1
1
2
3
4
5
6
7
8
9
10
11
# generate an ssl cert a .cnf cert definition found in the
openssl req `
    -newkey rsa:2048 `
    -x509 `
    -nodes `
    -keyout ./ssl/server.key ` # replace with correct file path
    -new `
    -out ./ssl/server.crt ` # replace with correct file path
    -config ./ssl/certdef.cnf ` # replace with correct file path
    -sha256 `
    -days 365
With the certificate and key created, we can now move on to installing the cert and updating our packages.json script
Certificate Installation
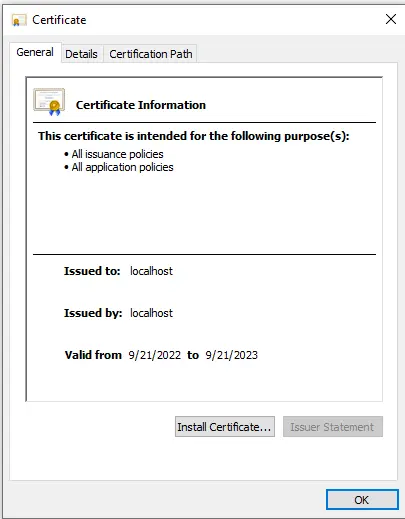
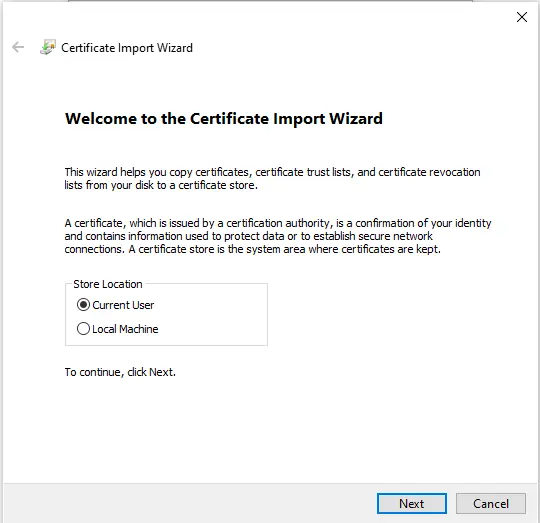
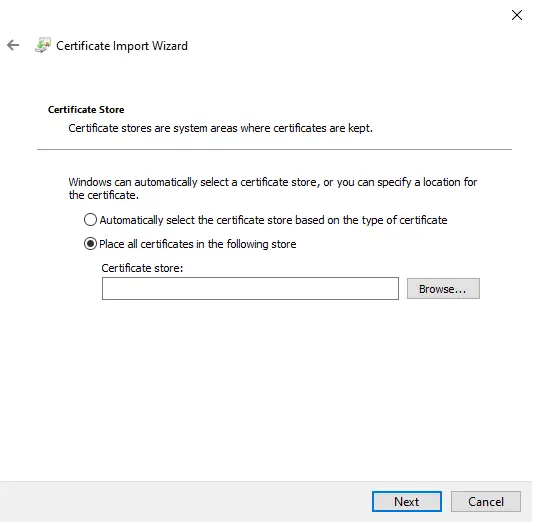
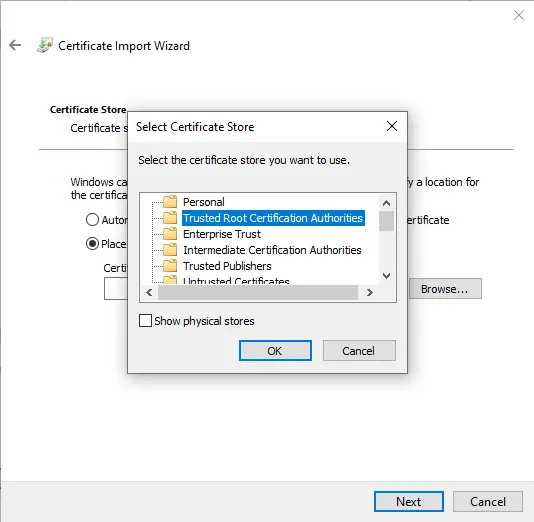
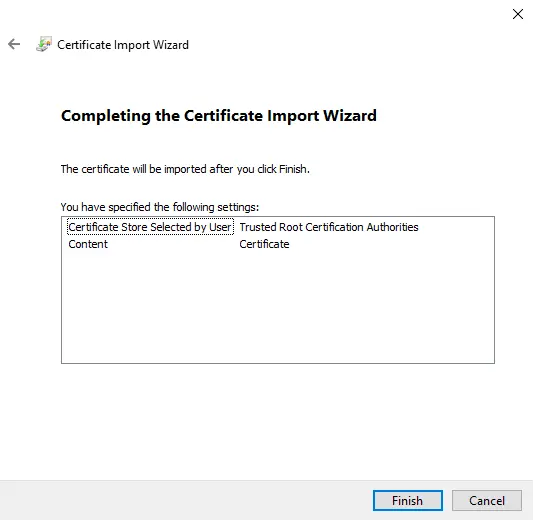
To install the certificate on Windows, navigate to the expressjsssl/ssl/ folder and double click on the certificate. This will open up the Certificate Import Wizard. On the Certificate Import Wizard, click through the wizard to place the certificate in the following location
Install Certificate > Current User > Place all Certificates in the following store > Browse > Trusted Root Certification Authorities > Ok
1. Click Install Certificate
2. Select Current User
3. Select Place all Certificates in the following store, Browse
4. Select Trusted Root Certification Authorities
5. Select Finish
Updating the Express www.js file To Use Your New SSL Cert
Let’s take a second for a quick recap prior to going any further. At this point, we’ve 1) Cloned the expressjsssl or created a new app using express-generator 2) Generated a cert for utilization in the Express web framework 3) We’ve installed the certification in a local cert authority. The final item to check off our list is to configure Express to utilize our newly created certificate. Let’s bring this thing on home.
Whether we cloned the Express github repo or created a new Express app from scratch, we still need to update the bin/www.js to run the ssl/server.crt file as it’s accepted certificate.
Making these changes is quite easy and if you cloned the expressjsssl, you can simply open that the bin/www.js file to view the updates. For those following along and building a new Express app, I’ll include the changes here along with some additonal comments.
require('https')notrequire(http)- If you forget to change your server.js to include the https package, the server will not include your ssl options and thus https will fail in the browser.
require('fs')- Don’t forget to include Node.js’s file reading import
fs, this is necessary to read the cert found in ssl/server.crt
- Don’t forget to include Node.js’s file reading import
sslOptions- As you configure your key and cert parameters in the ssl options, be sure they point to the correct path. Incorrect paths will cause your localhost app to fail to load in the browser
Update SSL Port- Although this isn’t necessary, I do like to set my SSL port to a more traditional ```X001`` port number
https.createServer(sslOptions, app)- We need to update the server to utilize
httpsand nothttpalong with the perviously configured sslOptions and specified port number
- We need to update the server to utilize
bin/www.js script
1
2
3
4
5
6
7
8
9
10
11
12
13
14
15
16
17
18
19
20
21
22
23
24
25
26
27
28
29
30
31
32
33
34
35
36
37
38
39
40
41
42
43
44
45
46
47
48
49
50
51
52
53
54
55
56
57
58
59
60
61
62
63
64
65
66
67
68
69
70
71
72
73
74
75
76
77
78
79
80
81
82
83
84
85
86
87
88
89
90
91
92
93
94
95
96
97
98
99
100
101
102
103
#!/usr/bin/env node

/**
 * Module dependencies.
 */

var app = require('../app');
var debug = require('debug')('expressjsssl:server');

// 1. Be sure to use "https" and not "http" here!
var https = require('https');

// 2. Required to read ssl cert
const fs = require('fs');

// 3. configure up your ssl options
const sslOptions = {
  key: fs.readFileSync("./ssl/server.key"),
  cert: fs.readFileSync("./ssl/server.crt")
}

/**
 * 4. Get port from environment and store in Express.
 */

var port = normalizePort(process.env.PORT || '3001');
app.set('port', port);

/**
 * 5. Create HTTP server. Modify the original "var server = http.createServer(app);""
 */
var server = https.createServer(sslOptions, app);

/**
 * Listen on provided port, on all network interfaces.
 */

server.listen(port);
server.on('error', onError);
server.on('listening', onListening);

/**
 * Normalize a port into a number, string, or false.
 */

function normalizePort(val) {
  var port = parseInt(val, 10);

  if (isNaN(port)) {
    // named pipe
    return val;
  }

  if (port >= 0) {
    // port number
    return port;
  }

  return false;
}

/**
 * Event listener for HTTP server "error" event.
 */

function onError(error) {
  if (error.syscall !== 'listen') {
    throw error;
  }

  var bind = typeof port === 'string'
    ? 'Pipe ' + port
    : 'Port ' + port;

  // handle specific listen errors with friendly messages
  switch (error.code) {
    case 'EACCES':
      console.error(bind + ' requires elevated privileges');
      process.exit(1);
      break;
    case 'EADDRINUSE':
      console.error(bind + ' is already in use');
      process.exit(1);
      break;
    default:
      throw error;
  }
}

/**
 * Event listener for HTTP server "listening" event.
 */

function onListening() {
  var addr = server.address();
  var bind = typeof addr === 'string'
    ? 'pipe ' + addr
    : 'port ' + addr.port;

  const listeningMessage = 'Listening on https:localhost:' + port;
  console.log(listeningMessage)
  debug('Listening on ' + bind);
}
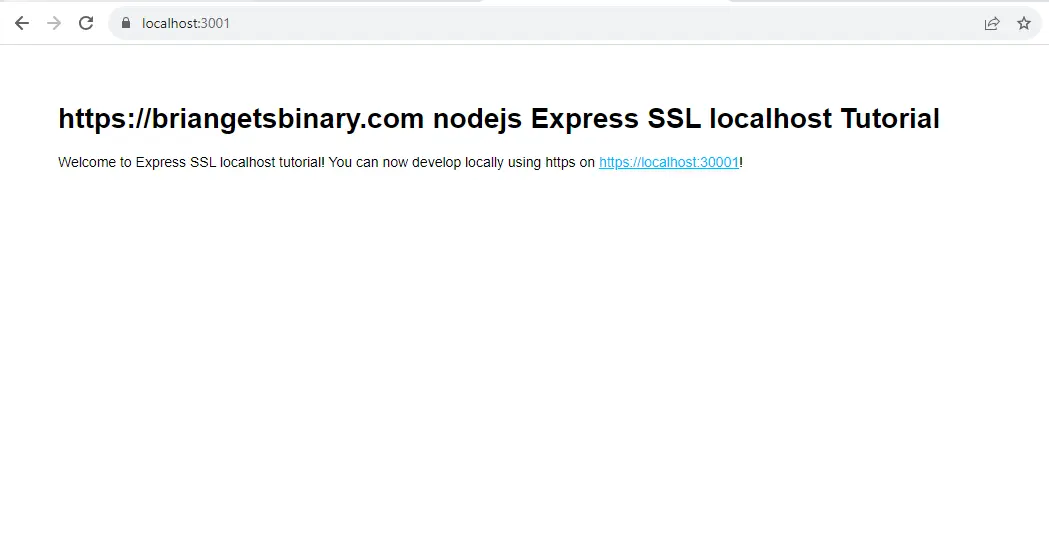
With our www.js Express server configured and custom cert installed into the Certificate Authority, we are ready to test the worlds greatest Express app running SSL on localhost!
1
npm run start
Given our hands were steady and free of typos, you should see an incredible index.html page servered over localhost from Express js!
Thank you for following along with me and happy coding!
Resources
Brian Mikinski expressjs GitHub Express js Getting Started Express js Guide
